
Esco Eversharp Bucket Lip Mount
Time:
2021-09-15
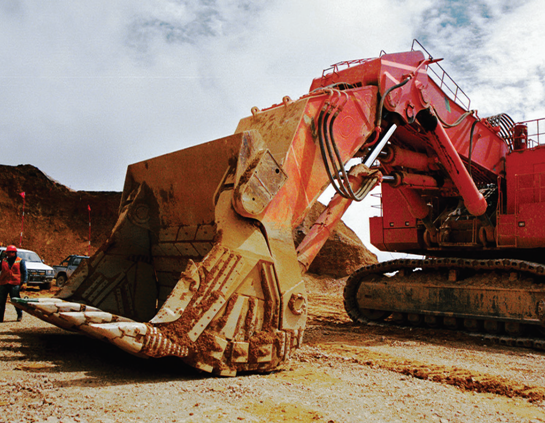
ESCO Eversharp Bucket Lip Installation Introduction
ESCO Eversharp Front Shovel Lip Mount
Introduction:
Mounting the Eversharp lip to the bucket consists of three steps
1 Mark the original bucket as required to determine the cutting position
2 Cut off the bucket lip of the original bucket with gas cutting along the scribed line
3 Weld the ESCO Eversharp lip to the bucket cutout
important hint:
To maintain bucket capacity, load capacity and weight balance, the following instructions must be followed carefully, as well as careful installation to ensure the attachments are optimal for strength, wear life and efficiency.
If you have questions about the installer, or need other additional information, please stop the installation and contact ESCO personnel.
Please observe the following operating procedures:
• Ensure that operators and maintenance personnel fully understand the use and maintenance of ESCO EVERSHARP bucket lips.
• Check component tightness daily.
• Replace worn parts promptly.
• Make sure you have a spare set at the job site - especially the tips and boots.
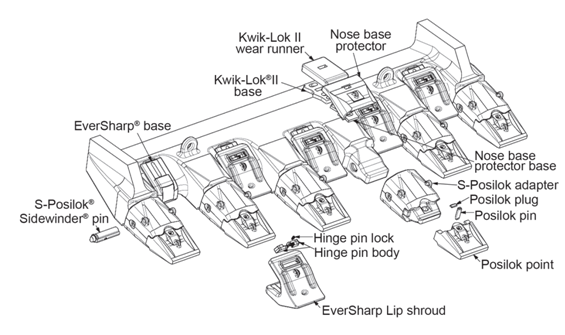
一、Preparation before installation:
1.1 All components of the ESCO EVERSHARP bucket lip have been shipped to the site. For ease of installation and welding, all lips, sheaths, tips, roots and screw pins must be removed to avoid arc damage during welding.
NOTE: Failure to remove the boot during welding will result in damage to the boot and bucket lip.
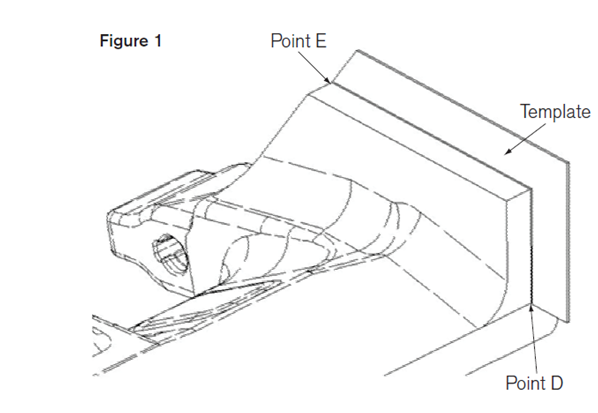
1.2 In order to determine the cutting shape on both sides of the existing bucket, it is necessary to use a material such as cardboard to make a template, and draw the edge of the rear end of the ESCO Eversharp bucket lip and the contours of both sides, as shown in Figure 1. Make sure the template covers the full length of the upper edge on both sides of the bucket lip and the lower edge extends to the rear of the wings. Mark points D and E.
important hint:
二、ensure no deformation during cutting and welding, temporary support of the bucket is recommended.
2. Cut to remove the original bucket lip
Line out the Eversharp lip profile on the bucket as shown in Figure 2.
WARNING: Place the bucket on a level surface and pad/plug securely to ensure it does not move during work, as shown in Figure 2.
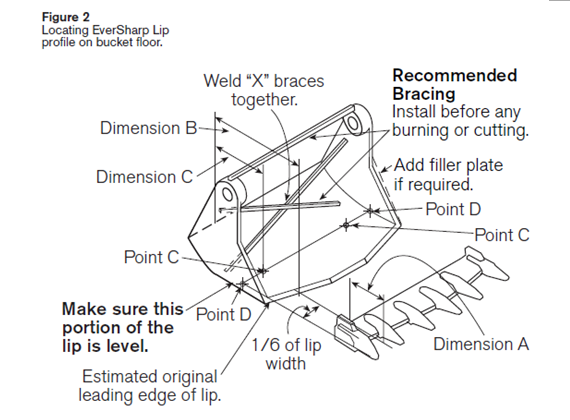
2.1 Measure and record the depth of the Eversharp lip at 1/6 of the width (dimension A).
2.2 Take a point on the inside of the bucket, 1/6 of the total width, measure and record the distance from the front edge of the original bucket lip to the back of the bucket at this point (dimension B)
2.3 B—A=C, to obtain dimension C, at 1/6 of the original bucket lip width, measure the length C from the back of the bucket forward to obtain the intersection point C.
2.4 Use the same method to obtain the same point C on the other side, and connect the two points with a straight line to determine the cutting line. The intersection of the cutting line and the two sides of the bucket is point D.
2.5 If the original bucket lip is an ESCO Loadmaster cast bucket lip, the contour lines of the two wings should be exactly the same.
2.5.1 Place the Eversharp bucket lip template on the inside of the bucket, and align the D point on the template with the D point on the bucket. If the E point on the template is not aligned with the edges of both sides of the bucket, it is necessary to align the template. Move accordingly within the range of values shown in Table 3 to align point E.
If moving within this range still fails to align point E, or if changes to the bucket profile cause the template to be reworked, stop work and contact ESCO personnel.

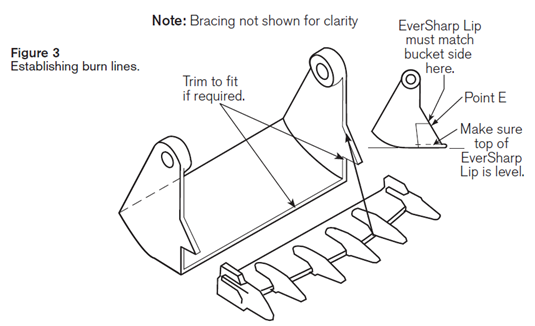
2.5.2 Make sure that the template is properly placed on the bucket lip, and draw the outline of the template on both sides of the bucket. If the template moves within the range listed in step 1, it is necessary to re-determine the cutting line according to point D on the template, and the shovel The back of the bucket is parallel.
IMPORTANT: Make sure to double check the entire cut line position.
2.5.3 Remove the template and cut off the original bucket lip along the cutting line.
三 、Install Eversharp Bucket Lips
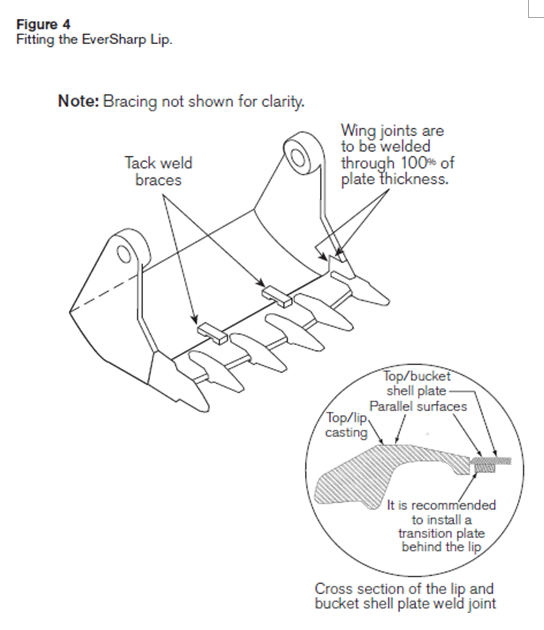
3.1 Make sure that the cutting edge of the bucket and the edge of the Eversharp lip are free of collisions and other variations affecting installation, as shown in Figure 4, properly angled as required.
3.2 Align and center the Eversharp lip against the bucket, some edge trim may be required to achieve alignment.
IMPORTANT: Make sure the Eversharp lip is level and at the same cut-in angle as the original lip, and the top of the Eversharp lip is flush with the plane of the bottom of the bucket.
3.3 When the Eversharp is properly aligned in place, spot weld in place in preparation for final welding.
四、final welding
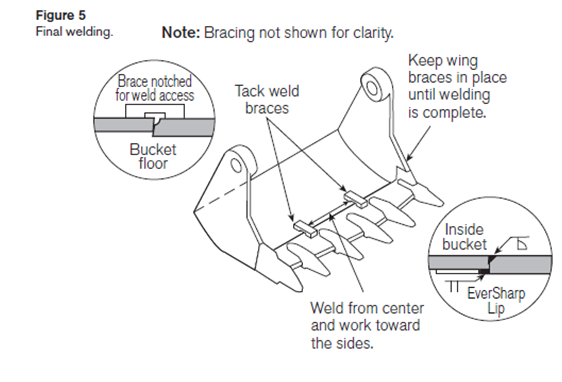
Use the corner material to make two connecting and fixing blocks, and spot-weld the bucket lip and the bucket firmly. Make two notches in the fixing block so that subsequent welding can reach its lower part.
Refer to manual P6000GEN for recommended welding methods and welding materials, including installation data.
After preheating, start welding from the center and proceed to both sides of the bucket.
Notice:
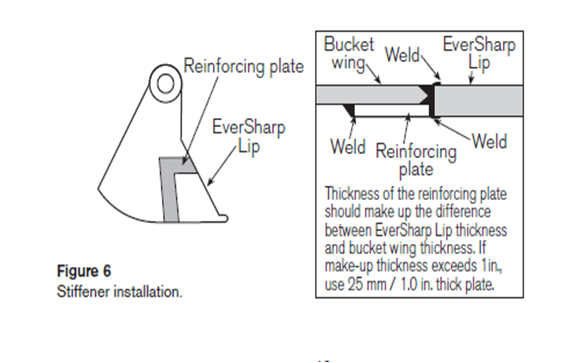
ESCO recommends installing a reinforcement plate immediately on the outside of the Eversharp bucket lip, especially under heavy load conditions, as shown in Figure 6.
五、Summary of Welding Instructions
Electrode: E7016 or E7018 low hydrogen type (drying).
Preheat temperature: When the ambient air temperature is above 5°C/40°F: 95°C/200°F
When the ambient air temperature is below 5°C/40°F: 175—— 200°C/350——
400°F
Interpass temperature: below 260°C/500°F
After heat temperature: When the ambient air temperature is below 5°C/40°F: 175—— 200°C/350——
400°F then cool.
Use a short wire bead with a single bead braided width of no more than 19mm/0.75in, and remove the slag after welding.
